Product Fulfillment Information
To complete your subscription, you must review information about your technical contact and provide fulfillment-related information that 47Lining requires to install 47Lining Enterprise PaaS - Preview Deployment into your AWS account.

Follow the detailed instructions below to find the requested information and configure required 47Lining access to your AWS account.
Target Account Requirements
In order to achieve a successful product installation, your chosen AWS Target Account must have sufficient Applied Service Quota values available. The minimum Service Quota levels noted here are required, but not necessarily sufficient given that your account may be subject to additional guardrail constraints that are enforced by AWS. Applied Service Quotas are managed by AWS on a case-by-case basis. Resolution of requests for Service Quota increases may take several days.
To check your Applied Service Quotas:
-
Log in to your AWS Target account using the AWS Management Console.
-
Navigate to Lambda Concurrent executions and select your intended AWS Region for installation.
- Note the Applied quota value. It must be a minimum of 120. If it is not at least the minimum value, you will need to Request quota increase
-
Navigate to EC2 Running On-Demand Standard instances and select your intended AWS Region for installation.
- Note the Applied quota value. It must be a minimum of 96. If it is not at least the minimum value, you will need to Request quota increase
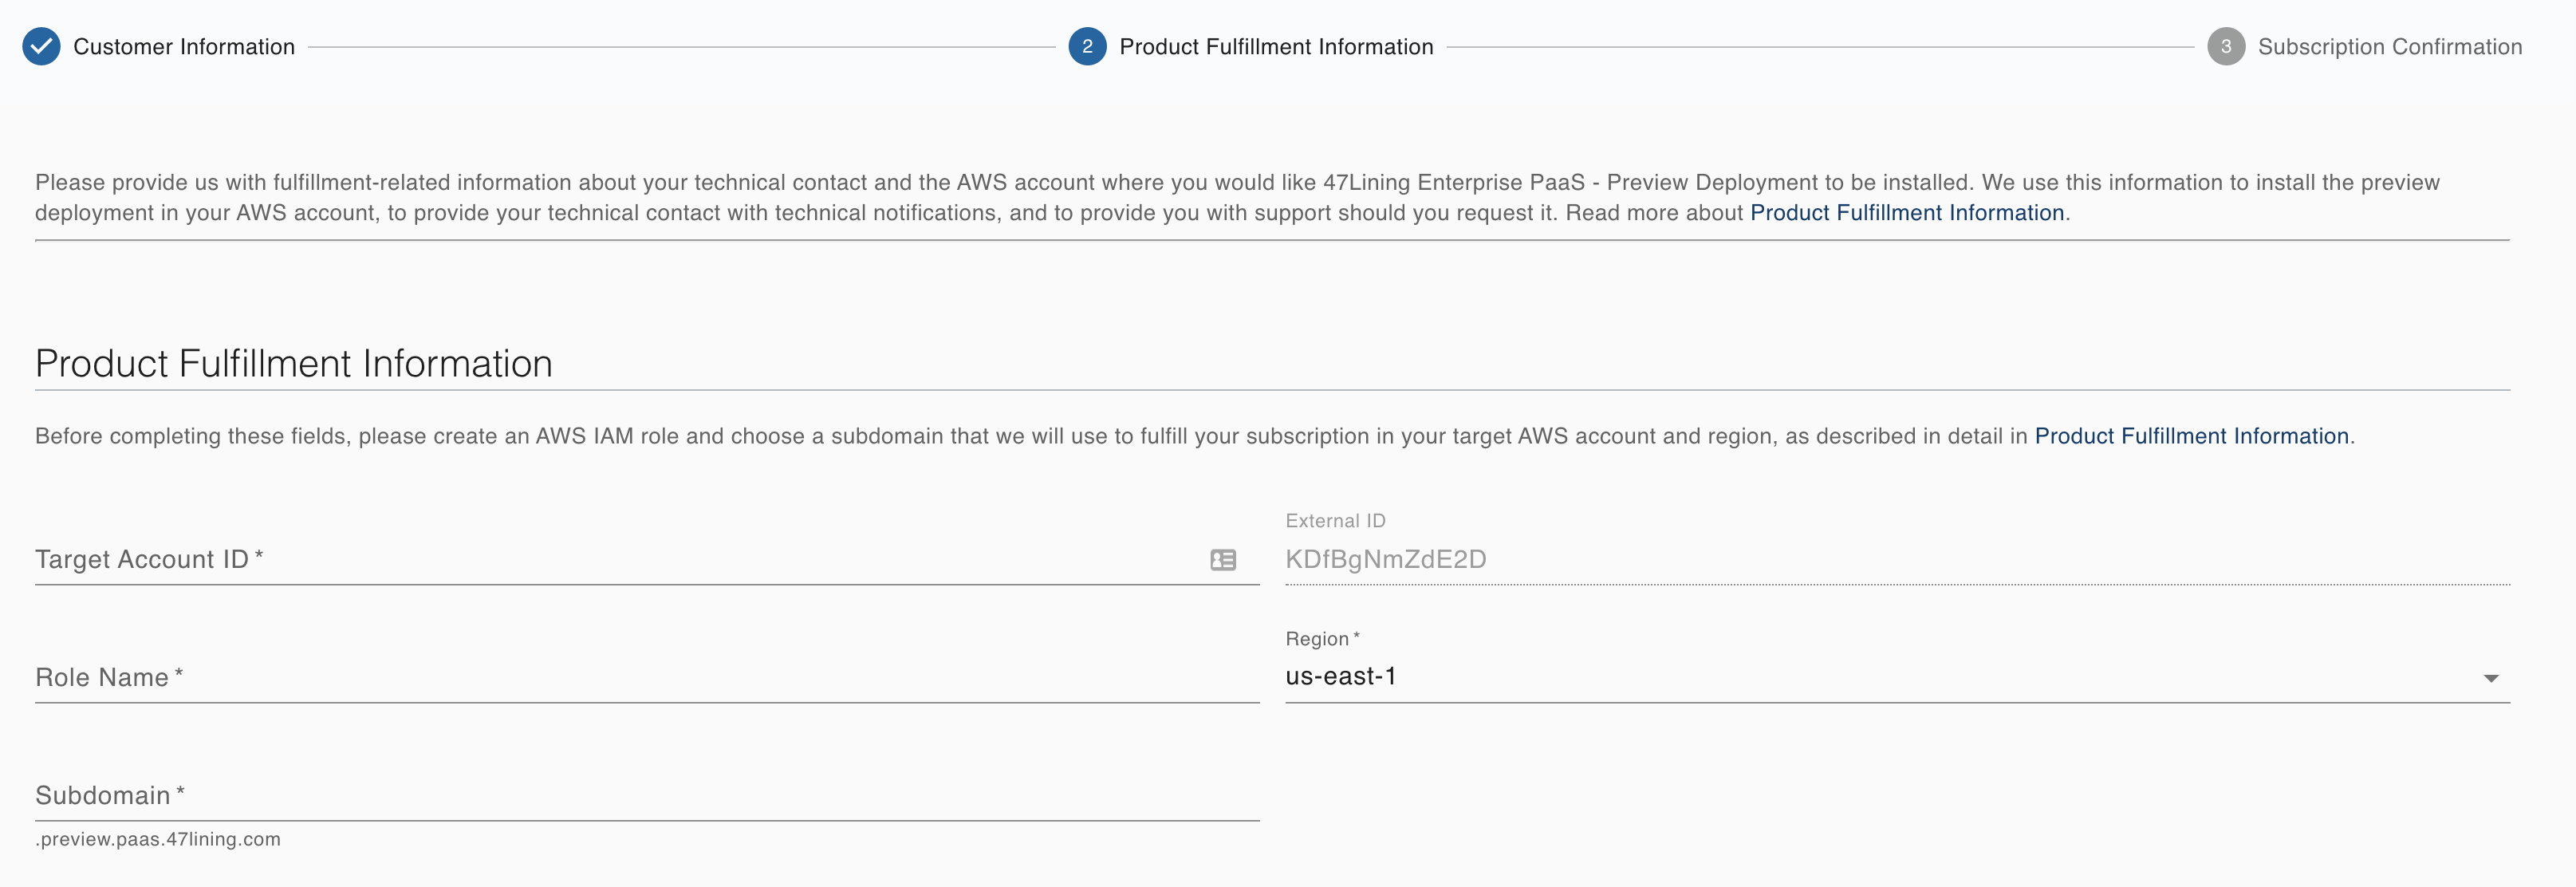
Target Account ID
Enter the Target Account ID for the AWS account where you would like 47Lining Enterprise PaaS - Preview Deployment to be installed.
- To find this number, log into the AWS account using the AWS Management Console.
- On the right side of the top navigation bar, click on your user ID drop-down and select the copy icon next to your 12-digit account number.
- Paste this Account number into the Target Account ID field of the Product Fulfillment Information page.
Role Name & External ID
In order for 47Lining Enterprise PaaS - Preview Deployment to be installed in your target AWS account, you will need to create a fulfillment role in that account. The fulfillment role is an AWS IAM role that you permit 47Lining to assume. It provides 47Lining with access required to fulfill your subscription into your target AWS account.
-
To create this role, navigate to IAM in the AWS Management Console in your target AWS account.
-
You will need to create a custom policy and attach it to the new role. Start with the policy. In the left pane, click
Policies -
In the right pane, click
Create policyThe Create policy page appears. -
In this step you will enter the access permissions that 47Lining requires to provision the underlying AWS resources within your Preview Deployment. You will be able to revoke these permissions once your subscription has been fulfilled. Click the tab
JSON. Delete the contents of the editor box and copy/paste the following text:{ "Version": "2012-10-17", "Statement": [ { "Effect": "Allow", "Action": [ "iam:PassRole", "iam:CreateServiceLinkedRole" ], "Resource": [ "arn:aws:iam::*:role/OSDUR2DynamodbTableScalingRole-*", "arn:aws:iam::*:role/OSDUR2EcsAutoScalingRole-*", "arn:aws:iam::*:role/OSDUR2EcsTaskExecutionRole-*", "arn:aws:iam::*:role/OSDUR2EntitlementsLambdaRole-*", "arn:aws:iam::*:role/OSDUR2PipelineDeployRole-*", "arn:aws:iam::*:role/OSDUR2PipelineDestroyRole-*", "arn:aws:iam::*:role/aws-service-role/dynamodb.application-autoscaling.amazonaws.com/*", "arn:aws:iam::*:role/aws-service-role/ecs.amazonaws.com/*", "arn:aws:iam::*:role/aws-service-role/ecs.application-autoscaling.amazonaws.com/*", "arn:aws:iam::*:role/aws-service-role/elasticache.amazonaws.com/*", "arn:aws:iam::*:role/aws-service-role/elasticloadbalancing.amazonaws.com/*", "arn:aws:iam::*:role/aws-service-role/es.amazonaws.com/*" ] }, { "Effect": "Allow", "Action": [ "cloudformation:CreateChangeSet", "cloudformation:CreateStack", "cloudformation:DeleteStack", "cloudformation:DescribeStacks", "cloudformation:ListStackResources", "cloudformation:ListStacks", "cloudformation:UpdateStack", "codebuild:BatchGetBuilds", "codebuild:CreateProject", "codebuild:DeleteProject", "codebuild:UpdateProject", "codepipeline:CreatePipeline", "codepipeline:DeletePipeline", "codepipeline:GetPipeline", "codepipeline:GetPipelineState", "codepipeline:ListPipelines", "codepipeline:RetryStageExecution", "codepipeline:TagResource", "codepipeline:UpdatePipeline", "ec2:CreateKeyPair", "ec2:DescribeKeyPairs", "ec2:DescribeVpcs", "ecs:RunTask", "eks:*", "iam:AttachRolePolicy", "iam:CreatePolicy", "iam:CreateRole", "iam:DeletePolicy", "iam:DeleteRole", "iam:DetachRolePolicy", "iam:GetPolicy", "iam:GetRole", "iam:GetRolePolicy", "iam:ListPolicyVersions", "iam:PutRolePolicy", "iam:TagRole", "lambda:CreateFunction", "lambda:DeleteFunction", "lambda:GetFunction", "lambda:TagResource", "resource-groups:*", "route53:ChangeTagsForResource", "route53:CreateHostedZone", "route53:DeleteHostedZone", "route53:GetChange", "route53:GetHostedZone", "route53:ListQueryLoggingConfigs", "route53:ListTagsForResource", "s3:CreateBucket", "s3:DeleteBucket", "s3:DeleteObject", "s3:DeleteObjectVersion", "s3:GetBucketPolicy", "s3:GetBucketVersioning", "s3:List*", "s3:Put*", "servicequotas:GetServiceQuota", "ssm:DeleteParameter", "ssm:GetParameter", "ssm:PutParameter", "states:CreateStateMachine", "states:DeleteStateMachine", "states:DescribeStateMachine", "states:TagResource", "sts:GetCallerIdentity" ], "Resource": "*" } ] } -
Click
Review policy. Enter a Name (e.g. OsduPreviewDeploymentFulfillmentPolicy), and an optional Description (e.g. "minimal policy for OSDU Preview Deployment subscription fulfillment"). ClickCreate policy -
On the next page, in the left pane click
Roles, then in the right pane clickCreate role. -
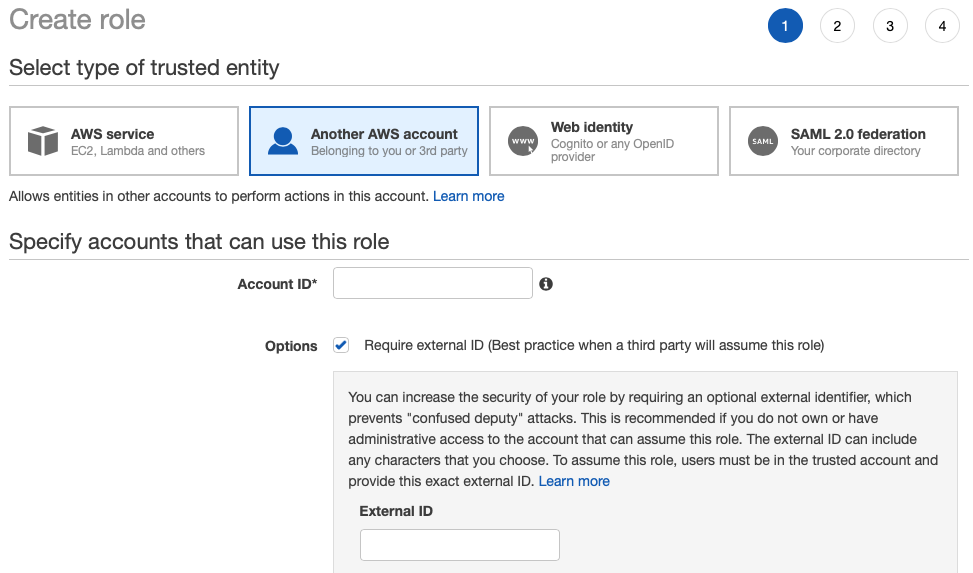
On the Create role page, click
Another AWS Accountand select Options ☑ Require external ID
-
In the Account ID field, enter 523544000011. This is the 47Lining AWS account that will install 47Lining Enterprise PaaS - Preview Deployment into your AWS account.
-
In the External ID field of the Create role page, enter the value of the External ID shown on the Product Fulfillment Information page of the 47Lining Subscription Portal.
-
Click
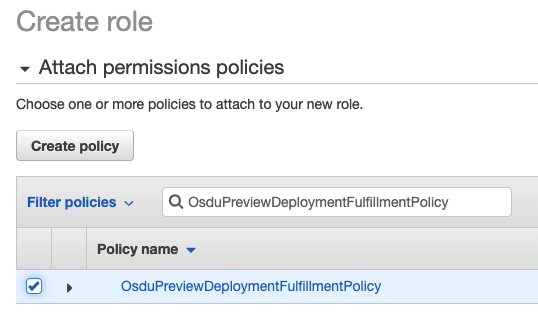
Next: Permissions. Enter your new policy name in the search box. Click the check box next to your policy.
-
Click
Next: Tags. Add any tags desired (optional) and clickNext: Review -
Enter a role name (e.g.: OsduPreviewDeploymentFulfillmentRole) and click
Create role -
Copy this role name into the
Role Namefield of the Product Fulfillment Information page.
Region
In the Region field of the Product Fulfillment Information page,
select the AWS Region where you would like 47Lining Enterprise PaaS -
Preview Deployment to be installed.
Subdomain
Your installation of 47Lining Enterprise PaaS - Preview Deployment
will be accessible at a unique subdomain with the fully qualified
domain name <subdomain>.preview.paas.47lining.com. Please provide
the name of the subdomain that you would like to use. Your subdomain
must include only lower-case letters a-z, numbers 0-9, and hyphen
-, and must not exceed 63 characters. Your subdomain will be
publicly visible and resolvable through the global DNS system.
Technical Contact
Please review the contact information for the person who will receive technical notifications and administration-related communications for your subscription to 47Lining Enterprise PaaS - Preview Deployment.

Note
Subscriptions to 47Lining Enterprise PaaS - Preview Deployment do not support edits to technical contact information, which is always identical to the information that you used when you created your 47Lining Subscription Portal account. The Subscription Portal displays technical contact information for your convenience and review. 47Lining Enterprise PaaS - Production supports technical contacts that are distinct from the AWS Marketplace subscriber.